VIDEO: Felt Japanese Anemones

Go where the wind(flower) takes you
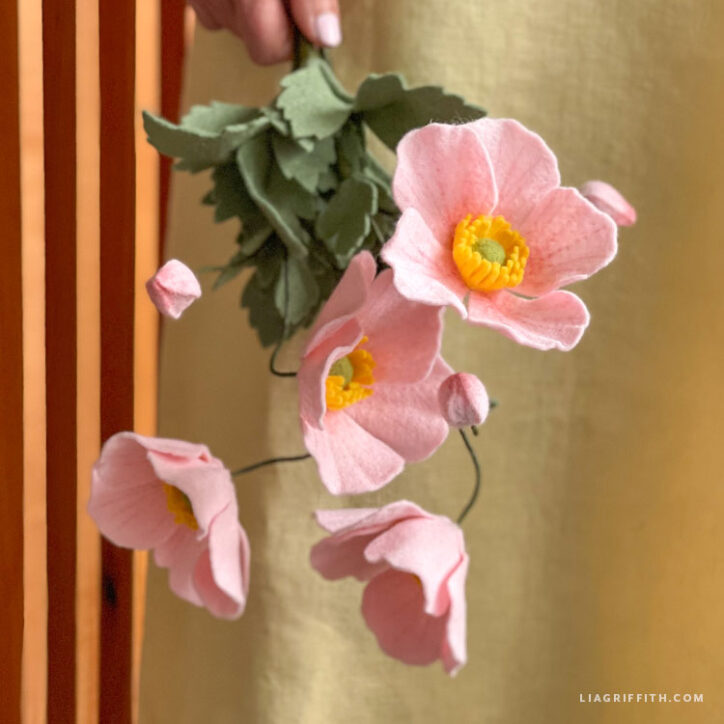
While reflecting on our 10-year anniversary and all of the flowers we've designed, the anemone is one we've made over and over again. It's such a beautiful, yet simple flower to craft. And though we've made many different versions over the years, these felt Japanese anemones are a first!
Downloads
Photo Tutorial PDF Template SVG Cut FilesTools
Materials
- Craft Bundle (save on the items below while stock lasts)
— OR —
- Lia Griffith’s Wool Blend Felt — Sweet Pink, Sunshine, Eucalyptus, and Fern
- Floral Wire – 18-Gauge Paper Covered Green and 24-Gauge Paper Covered Green
- Floral Tape — Pine
Additional materials:
- Lia Griffith Felt Balls 1cm — Any color (tutorial shows Merlot)
- Light Pink Art Marker — Tombow Dusty Rose (772)
- Aleene’s Stiffen-Quick Fabric Stiffening Spray

If you've made our crepe paper version, then you may know the anemone is often referred to as a windflower. This is due to the flower's appearance of looking blown open by the wind. To achieve this, we will show you how to shape the petals after assembly to give your felt Japanese anemones a more open, ruffled look.
Along with learning how to make the flowers, our tutorial also shows how to make buds. If you'd like, you can combine buds and blooms on one stem for a bit of a natural wildflower look. For arrangement ideas, we think these felt Japanese anemones would look pretty with a bunch of stems and leaves in a pot, in a vase, or as individual stems in bud vases.
Skill level: Beginner
Crafting tip: Since this felt Japanese anemone is an easier flower with not as many parts, we recommend cutting by hand. That way you can cut petals with a slight irregularity that looks more natural.
This content uses links from which we may earn a commission. Disclosure.


Explore More
Love this felt anemone? Check out all of our felt flowers for more ideas.
Better Than Pinterest
Become a member and get instant access to a professional collection of 2000+ crafts, 400+ videos, and a growing library of master classes for all skill levels. For less than your daily coffee, you'll learn new skills and techniques, create beautiful handmade projects like this, and join a community of crafters just like you! Spend less time searching, more time crafting. It's better than Pinterest, promise. 😉
Become a Member

Discussion
Ask Lia or the community!
16 Comments
-

Shahlla
April 26, 2023 at 3:52am
-

Lia
April 26, 2023 at 8:58am
@Shahlla
-

Laura
April 21, 2023 at 10:05am
-

Lia
April 21, 2023 at 10:56am
@Laura
-

Laura
April 21, 2023 at 3:05am
-

Lia
April 21, 2023 at 8:58am
@Laura
-

Laura
April 20, 2023 at 2:33pm
-

Lia
April 20, 2023 at 4:24pm
@Laura
-

Leanna
April 19, 2023 at 12:10pm
-

Lia
April 19, 2023 at 12:13pm
@Leanna
-

Elizabeth
April 19, 2023 at 8:26am
-

Lia
April 19, 2023 at 8:37am
@Elizabeth
-

Anna
April 11, 2023 at 1:46pm
-

Lia
April 11, 2023 at 7:18pm
@Anna
-

Beth
April 3, 2023 at 4:47am
-

Lia
April 3, 2023 at 9:22am
@Beth
Leave a CommentReally cool felt flower project …. would love to see more felt flower live sessions or video tutorials … Thankyou for sharing and listening to us
You are so welcome! It was great to hear responses to our test run. More coming!
Hi Lia,
Thanks for the clarification. Maybe it should be reworded it is a bit confusing. Appreciate you getting back to me.
Sure, I understand. I go over this in the Cricut cutting machine Skill Course.
Hi Lia,
Sorry not understanding. Is it the outer box or the inner box that is suppose to be 12×12? The instructions say the box with the artwork so to me that sounds like the inner box since it is not already 12×12. Please advise.
Thanks,
Laura
It is the outer box. It should be 12×12 already, but we add the outer line and measurement because sometimes Cricut software upgrades causes things to shift. This is for those times.
Hi Lia,
I see on the SVG file that we are to resize the box with the artwork. So, do we first hide the text with this info and the Lia Griffith text then
resize the box with the petals etc? I am only asking because this makes the petals etc larger than the petals on the PDF Template.
Appreciate your help.
Thanks,
Laura
Before hiding any layers, confirm that the size is what is stated on the designer notes layer. Then you can hide that layers once the size matches. An outer box is created in that layer that is the exact size. Let me know if that works for you.
If you are used to felting… would it not be a good idea to actually felt the pieces together instead of using any glue?
You could try, but I am unsure how well they will hold. Let us know!
The buds are so pretty! 💖
These are so pretty in person too. 🙂
Is there a video tutorial with this? I can not find it. Thank you. Also can you clarify the ball size, 1 cm?
Hello Anna. The video will be live next week. There is a schedule on the homepage of the Spring Summit classes. Yes, the felt ball we will use is 1cm.
it’s a shame we have to wait until mid-month for the instructions on how to make a lot of this month’s projects. i get that some people would like to craft along with the lives but some of us would just like the instructions at the start of the month so we can get started 🙁
Thank you for your feedback and we thought it over. Today, we decided to post all of the tutorials (minus member make peony and embroidery). 🙂
Back to the Top